Your bike’s drivetrain is the part of the bike that transfers power from your body to the wheels.

Generally speaking, a bicycle drivetrain starts at the cranks. Force is applied in a spinning motion. This force pulls the chain, and in turn the rear gears, to spin the rear wheel of the bike.
Although we will be focusing on standard chain-drive bikes, there are bikes that don’t use a chain drive. Belt drive, gear drive, direct-drive, and even string-drive bikes use alternative means to turn the wheels.
Let’s look at a few of the different alternatives to chain-drive bikes.
Foot Conveyance
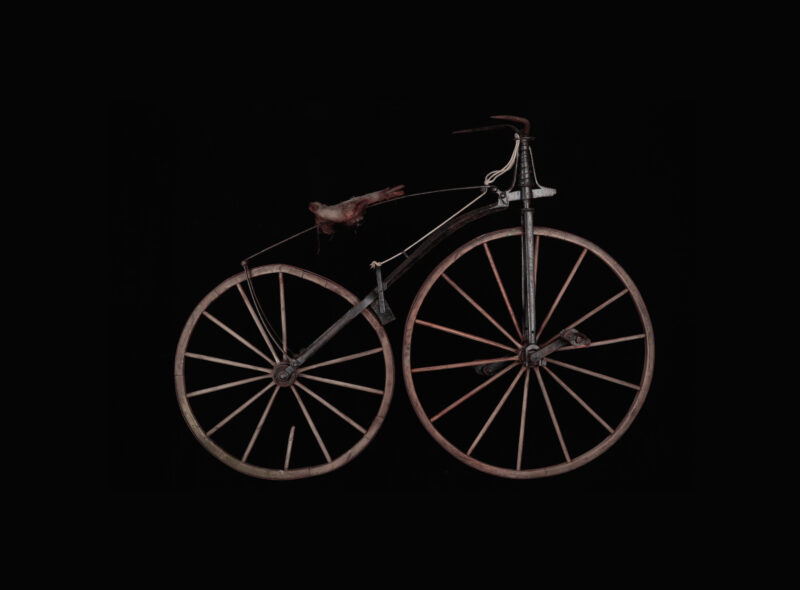
Foot Conveyance is the most basic form of wheeled transportation. The very first bicycles were called “Velocipedes”, or “Draisines”, and they didn’t have chains.
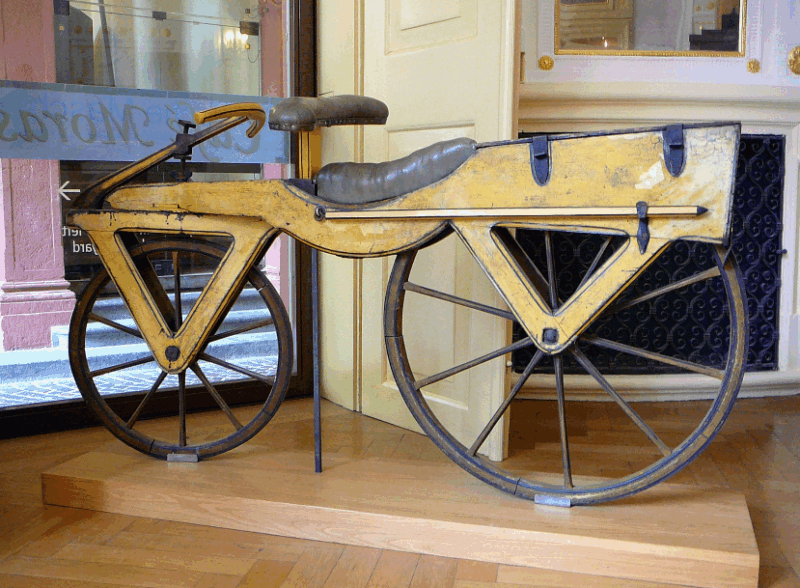
These designs still exist today in the form of kids’ balance bikes. They are a great way for new riders to learn balance while not being distracted by details like pedaling or shifting.
Direct Drive
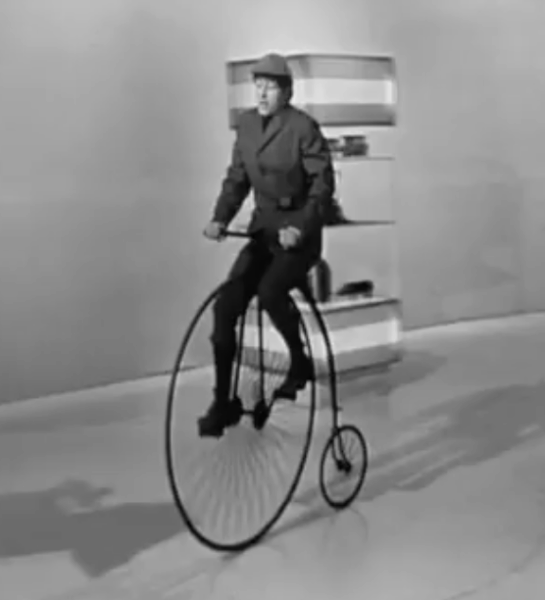
Direct Drive is about as basic as it gets. Your pedals and cranks are connected directly to the wheel. You pedal, you move. You stop pedaling, you stop.
Think of children’s tricycles, penny farthings, or unicycles. These represent a direct conversion of your leg energy into wheel rotation.
Chain Drive
This is the drivetrain type on almost every bike you see day-to-day. We’ll deep dive on these later in the video, so I won’t get into it too deeply right now.
When you think of chain-drive bikes, just think of road bikes, city bikes, mountain bikes, cargo, recumbents, tandems, fixies, e-bikes, and a bunch more.
Belt Drive
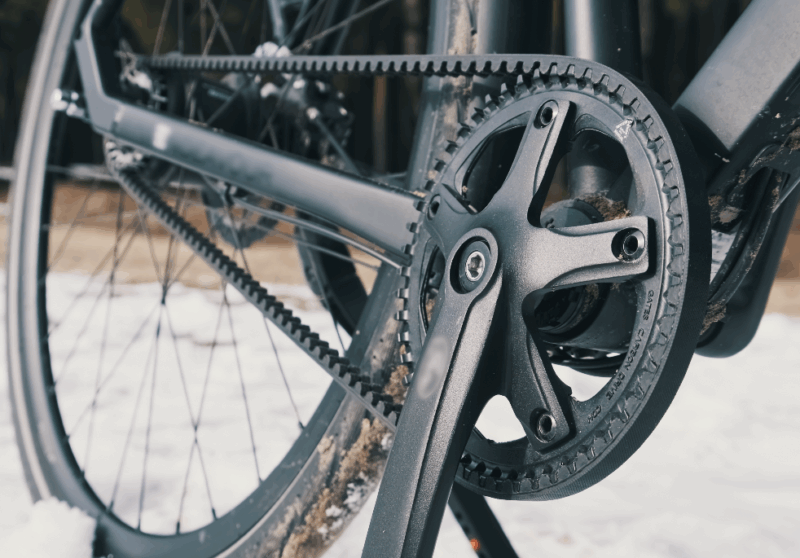
Belt drive bikes are rare, but they are making headway in the industry. Usually paired with internal shifting hubs, these bikes don’t use chains, but instead use flexible belts to carry the energy to the rear wheel. Advantages of these systems include a grease-free design, increased durability, and a quiet ride.
Shaft Drive
These bikes use a drive shaft, or a solid piece of material, to carry the propulsion load. These systems do not work well with derailleurs, so they are most often paired with internal sifting hubs.
String Drive
This system uses strings and pulleys to convey the energy from the pedals to the rear wheel. Rocker arms on each crank pull the string using cams.
These bikes are incredibly efficient, but the system is bulky, with drive hardware on both sides of the rear wheel. They can also be shifted without pedaling!
There are also assistive technologies like handcycles or row-bikes. These generally use chain drives and operate similarly to standard upright models.
When it comes down to it, chain drives simply had too many advantages when compared to other forms of propulsion, regardless of how efficient they might be. These advantages caused them to become the standard in terms of mechanical propulsion.
Efficiency and Power
When you ride a bike, your body’s power is directly translated into forward motion. There is almost nothing between your legs and the rear wheel that eats up the power you are sending through that system.
Areas where that power is wasted are:
- Friction in the system (caused by dirty chain links or poorly maintained bearings).
- A chainline that isn’t perfectly straight.
- Using smaller gears – this increases the friction on the chain links.
- Frame flex.
Let’s not confuse efficiency with drag. Efficiency is how well the energy from your body is transferred to wheel rotation. Drag is how much external forces influence the forward motion of the bike. One is internal to the bike’s propulsion, and the other only involves external factors like wind and terrain.
According to a Johns Hopkins study, bikes range from 81% to almost 99% efficient, with the vast majority closer to the top of that range.
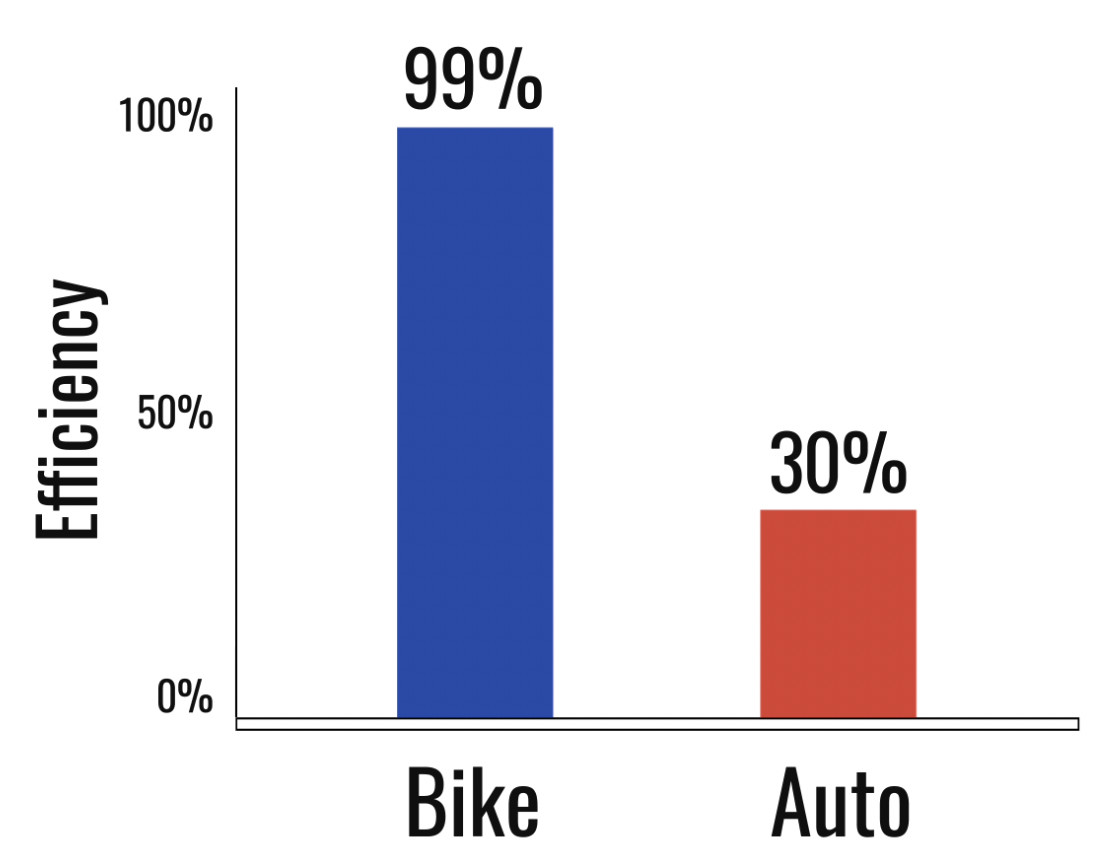
Let’s compare that to an average car. After losing energy to friction, heat dissipation, and exhaust, about 30% of the energy derived from gasoline actually makes it to the wheels.
That’s a huge difference!
A cyclist can ride approximately 194 miles using the amount of energy contained in one liter of gasoline. And with zero emissions!
Watts
Energy output is measured in watts. Watts are a standard of measurement for the transfer of energy. One watt is equivalent to the use of one joule per second.
Let’s start with a typical standard for wattage; the incandescent light bulb. These are the old ones, with a filament inside. Not the newer LED bulbs.
A 100 watt light bulb is pretty bright and is enough to light an entire room. It draws 100 watts. A typical cyclist can generate 150 to 200 watts. That’s enough to power almost two 100 watt bulbs for as long as the rider can pedal. Pro racers generate upwards of 400 watts or more! That’s enough power to run an entire typical household during off-peak usage!’
The more wattage you put into your pedal stroke, the more important it is to run a clean drivetrain. At higher wattages, any inefficiencies are amplified, producing greater wattage losses.
Standard Drivetrains
Drivetrains have evolved from basic, heavy systems into efficient and complex mechanisms And they’re also fun to use.
The first chain-driven bikes were developed simply as a way to get the rider’s legs away from the wheels. Pedaling a direct-drive bike was uncomfortable and sloppy.
In the tenth century, a Chinese engineer named Su Song developed a drive system for a sky-tracking clock tower that used a chain drive to transfer energy within the mechanism. His “Celestial Ladder” system was the progenitor of the modern bicycle drivetrain.
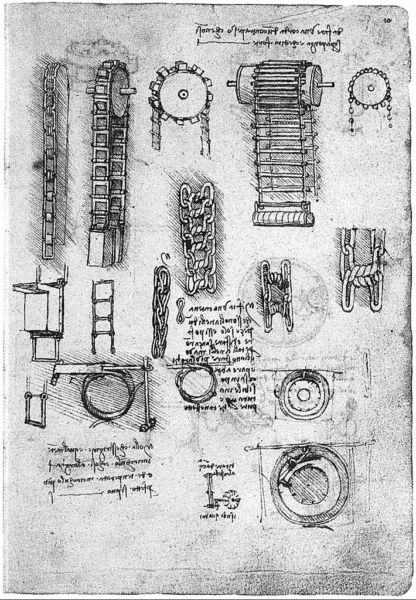
Leonardo DaVinci later sketched similar systems for chain-driven energy transfer. Although there is some debate on the subject, there is no direct evidence that the two concepts were related at all.
There are several styles of drivetrain that dominate the cycling industry. They are generally differentiated by the number of rear gears, and the number of front chainrings.
The very first multi-geared bikes had different size gears on both sides of the rear wheel. This was called a “flip-flop-hub”. When the rider desired a different gear, they simply dismounted, turned the rear wheel around, and mounted the new gear.
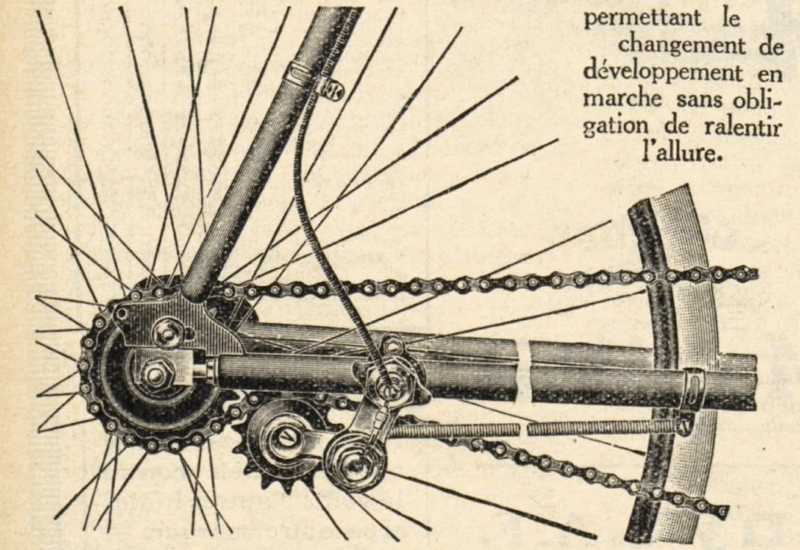
It wasn’t until the late 19th century that engineers saw a way to switch between multiple gears in one cluster. That’s when the modern derailleur started to take shape.
Fifty years ago, the typical bike was a “10 speed”. It had five gears in the back, and two chainrings in the front. That provided ten different combinations of gears, so it had “ten speeds”. It gave the rider plenty of options when choosing what gear to use on a climb or while riding down a hill.
As technology advanced, the number of gears in the back increased. Six, seven, eight, then nine gears were available on standard bikes. It was a glorious time to be a rider!
Then an additional chainring was added to the front of the drivetrain. Three chainrings was a massive increase over the standard two, and provided even lower gears for climbing the steepest hills.
More recently, we have seen 10, 11, and 12 gears added to the rear cassette, with gear ranges going up to 10-52 teeth. That’s a 520% difference between low and high gears!
Those bikes typically run with a single chainring up front, more commonly known as a “1x” system. The idea is that you can get a full gear range with your twelve gears in back, and you also lose weight and complexity by having fewer gears up front and no front derailleur. But that’s mostly on mountain bikes.
Road bikes have stuck to the 2x front chainring model. Yes, there are 1x and 3x road bikes, but current trends indicate that you only get an advantage from a 1x chainring if your rides are more limited; that is to say mostly flat terrain where a wide gear range isn’t as necessary.
Drivetrain Components
Standard bikes all pretty much use the same parts to do their job. Sure, they vary in type and design, but the overall list doesn’t vary much at all.
Here’s a rundown of these parts and how they work together:
Cranks
These are what your pedals connect to. They are the levers that your legs push to get the energy transfer started.
Chain
The chain carries the power from the cranks to your rear gears.
Front Chainrings
These are the front gears that are attached to your crank arms.
Rear Cassette/Freewheel
Your rear gears transfer energy from the chain to the rear wheel.
Front Derailleur
If you have more than one front gear, this is the device that allows you to move the chain between them.
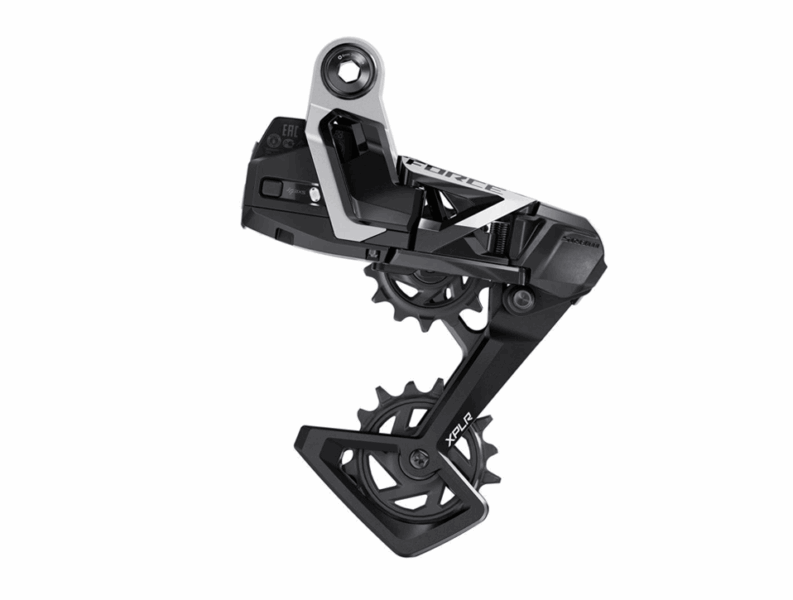
Rear Derailleur
The complex device that moves the chain from one gear to another on the rear wheel.
Bottom Bracket
This is the set of bearings that allow your cranks to turn solidly and smoothly.
Shifters
Located near your hands, these are the controls for your derailleurs that help them shift gears.
Rear Wheel
The rear wheel is the final step in the process. It receives your pedaling energy and pushes you forward through contact with the road or trail.
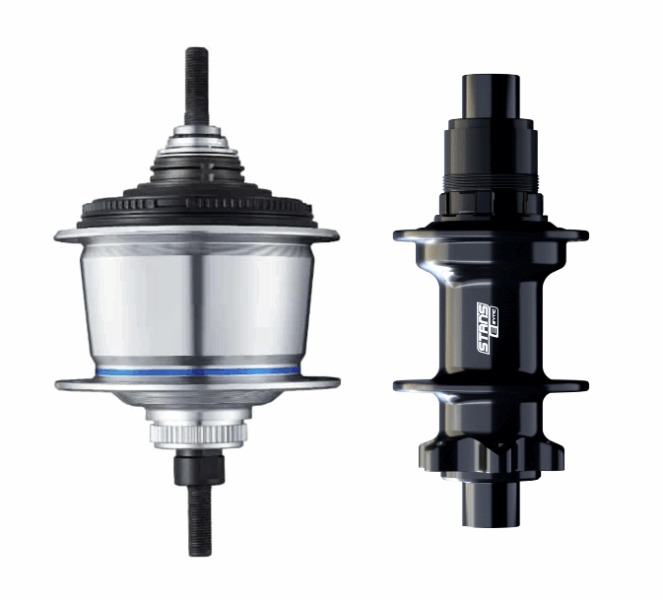
Before we move on, I want to take a few seconds to talk about internally geared hubs. They are by no means the standard for gearing, but they do exist on a lot of different bikes, and they are worth a mention.
These hubs are big. Like, really big. They need to be – they contain lots of gears and ratchets that are used to switch gearing without a derailleur.
Through the use of something called a planetary gear, these hubs can receive energy from the chain and multiply it to give you different levels of output at the rear wheel. These things are pretty cool!
Internally geared hubs eliminate the dangers of smashing your rear derailleur on a rock – a pretty handy perk for people who ride remotely over rough terrain!
They also require lower maintenance since most of the gearing isn’t exposed to the elements.
1x Drivetrains
The evolution of 1x drivetrains has led to important improvements in riding efficiency and effectiveness – mostly on the mountain bike scene.
The first 1x drivetrains appeared on cyclocross bikes. These bikes are tough, light weight machines that are built to participate in the incredibly brutal and harrowing sport of cyclocross. They must be ridden through mud, snow, and over obstacles, often needing to be dismounted and carried.
Removal of the front portion of the transmission, or the front derailleur, led to a lighter bike that was more reliable and skipped less in these ugly conditions. They were also easier to maintain.
As it turns out, 1x systems are easier to learn on. The more complex 2x and 3x systems required more concentration and, for new riders, led to mis-shifts. What chainring was right?
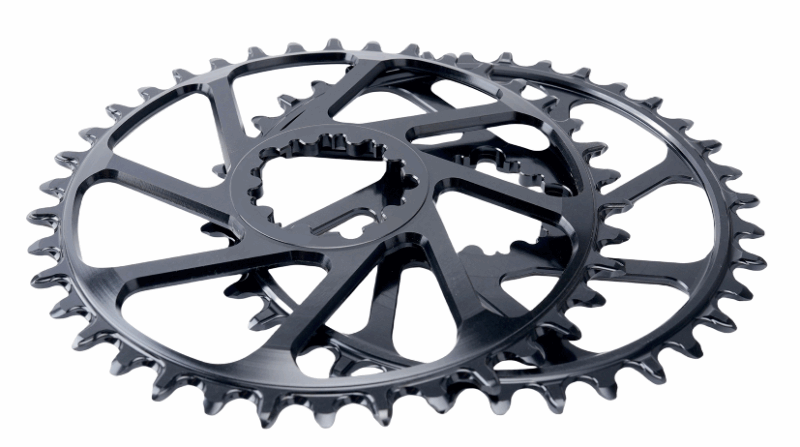
A detail regarding 1x drivetrains is one that isn’t mentioned often enough – the concept of narrow-wide chainrings.
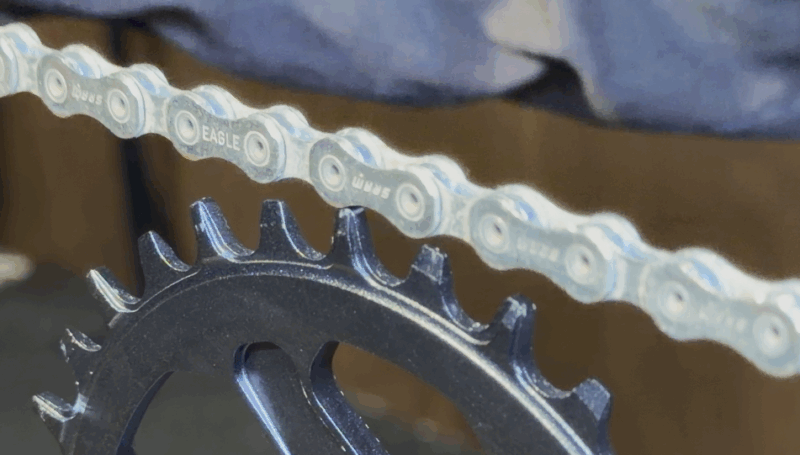
Narrow-wide is a system by which the chainring alternates the width of its teeth to match the narrow and wide links in the bike chain.
You cannot have narrow-wide systems on 2x and 3x drivetrains. The requirement of those systems to shift between front gears means that the chain may or may not land on the proper narrow or wide tooth, and the chain could hang up pretty quickly.
But for the transmissions that can use it, the narrow-wide model is a great way to keep that chain tightly attached to the chainring – a nice thing to have when you’re riding rough and rocky terrain.
Cranks
What makes your cranks, the parts that connect your pedals to your bike, and the levers you push down on to generate forward motion, so important?
Well, for one thing, that’s where your chainrings are. Your front gears connect to the cranks and pull that chain along its route. They are a simple concept that has evolved into a complex solution.
Your cranks are dense objects that must withstand a lot of force in order to transfer your pedal power without flexing or bending. To that end, they need to be strong.
But that also makes them heavy.
Originally, cranks were part of the bottom bracket (which we’ll discuss later), and they were one piece. They ran right through the frame. They were stiff, they were steel, and they added a lot to the weight of the bike!
Today, few bikes still use one-piece cranks, and still fewer use steel cranks. Most are made of aluminum, with the minority being made from carbon and titanium. They can get pretty light, but that degree of weight loss comes with its drawbacks.
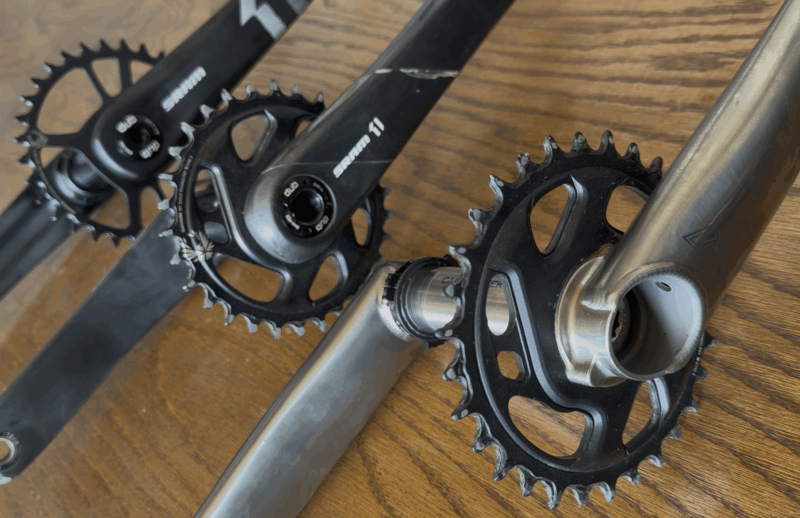
Titanium cranks are expensive. Like, very expensive! Machining and working titanium is no easy task, but if it’s done right, it can yield a crank that is stiff, light, and perfect for a bike that is more concerned with weight savings than cost.
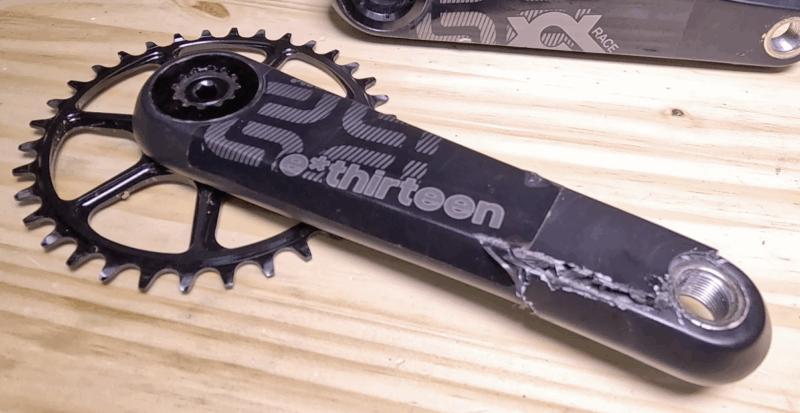
Carbon, while nice and stiff, also has its drawbacks.
Typically, the crank arm is the only part of the crank made of carbon. That means it must be bonded to metal in the places it connects to the pedals and bottom bracket. Repeated fatigue, or old age, can cause the carbon to “delaminate” from the metal parts. That’s what happens when the bonding agent fails. This issue manifests itself as a creaking noise at first, and can eventually lead to failure.
Aluminum seems to be the sweet spot. It is an affordable material that can be easily machined and has a degree of weight savings over steel. There’s a such thing as taking it too far, removing too much material from the crank and sacrificing its structural integrity in an effort to chase weight savings. But most aluminum cranks are pretty safe and sturdy – even if they are a bit heavier than their carbon counterparts.
Another important factor in crank methodology is length. How long is too long, and how short is “not long enough”?
Shorter cranks give you a bit of weight savings, but the real benefit, at least in the world of mountain biking, is clearance. You can’t always know exactly what the terrain will look like as it passes under your pedals. Sure, you can see the trail ahead of you, but your front wheel can easily kick up rocks and other debris, and your cranks and pedals might get in the way. Hitting a rock with your crank can cause issues ranging from jarring you to throwing you clean off the bike!
Advantages of longer crank arms are fairly obvious. Longer cranks give you more leverage, and therefore more torque when pushing those big gears. This is great news for long-legged road bike racers!
Cranks come in all sizes, especially if you consider kids bikes. Longer legs need longer cranks, generally speaking.
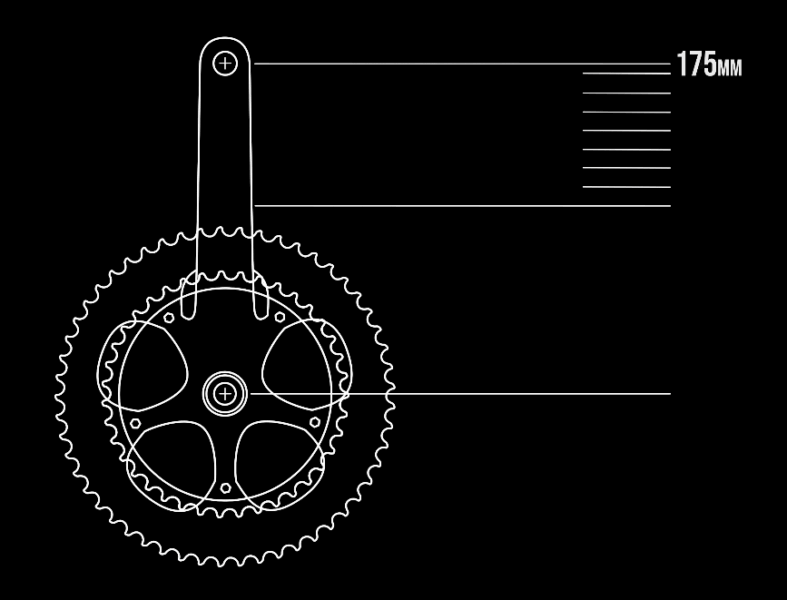
Adult cranks start at around 100mm, which is pretty darned short. They shoot on up to 175mm or longer.
Road bikes typically live in the world of 172.5 to 175mm, and mountain bikes will come in a little bit shorter with 165 to 170mm being closer to the standard.
Of course, there are exceptions and personal preferences that jump outside those boundaries on both ends.
Chains
Bike chains are pretty straightforward. They travel the length of your drivetrain, powered by your legs, and carry that energy to your rear wheel through derailleurs and gears.
The parts of a bike chain include the inner plates, outer plates, rollers, pins, and bushings. They can vary in style and dimension, but pretty much every bike chain has most or all of these parts.
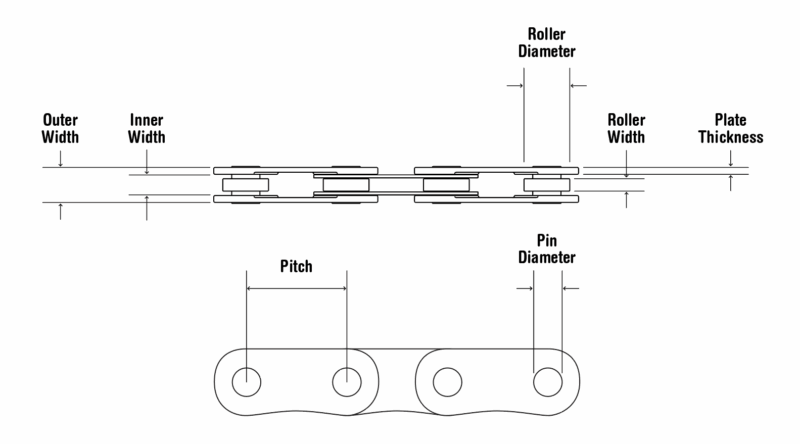
The pitch is the distance between pins. On bike chains, this is almost always ½”, or just shy of 13 millimeters.
Roller Width is just that – the width of the roller. The bigger this number is, the wider the gear tooth can be that the chain can fit on.
The roller diameter is designed to match the width of the gear, or the space between the gear teeth. These are paired for maximum surface contact.
The pin diameter can affect the strength of the chain. Pins are sometimes hollowed out for weight savings, at the cost of some loss of chain strength.
The inner width is the width of the chain’s inner plates. The outer width is, of course, the width of the outer plates.
Since the pins often stick out a bit past the outer plates, the overall chain width is measured by the pin length.
The plate thickness is a measurement of the chain plate.
Chains use these standardized measurements. These terms are used not just on bike chains, but on pretty much any unidirectional chain, like those found on geared machinery or chainsaws.
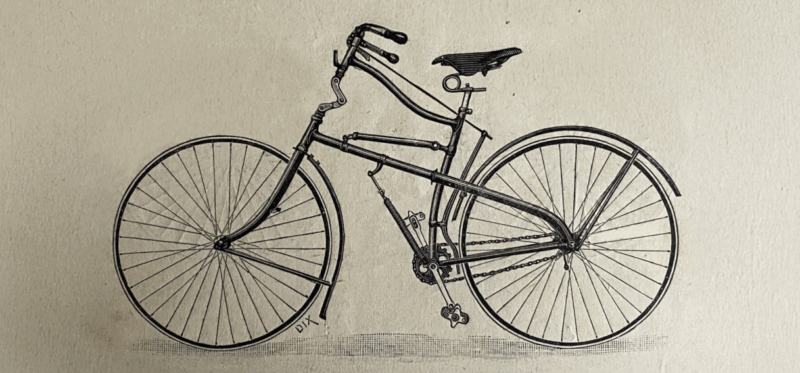
The path to today’s chains started out as a product of necessity. Bikes of over 100 years ago used similar mechanisms, but there were a few pretty big differences compared to today’s chain design.
The first chains were “skip tooth”, “block chains”, and “double roller” versions. They required chainrings with an unusually long pitch compared to today’s versions.
Chains eventually took on their more standard design and evolved into the ones you see on your bike today.
Current designs re-spaced the rollers to have the current, uniform pitch intervals of ½ inch. This design was a necessary step that made derailleurs possible (or at least practical). It’s a lot tougher to shift gears on a chain that has uneven pitch lengths.
Chain assembly is fairly obvious. The pins hold all the other parts together, and they are the key to chain assembly and maintenance.
Until recently, the pins were the only way you edited chain length. A chain would usually arrive having more links than a bike would need, and the mechanic would use a chain breaker tool to remove and rejoin links to achieve the proper size.
In the 1990’s, Shimano introduced the “master pin” concept. This used a double-length master pin that could be added to the chain in the link where it needed to be joined. The pin would be inserted into the open chain, driven through using a standard chain tool, and the end would be snapped off, leaving a solid pin, ready to use.
These pins were slightly larger than normal pins and were designed to be permanent. They were not designed to be removed or replaced.
More recently, both SRAM and Shimano started using a “master link” standard. This consists of an entire link that is designed to be inserted and snapped closed, making a standard link that can later be easily removed using thin pliers or a special tool.
These links were designed to make chain maintenance easier, and to be more serviceable when out on a ride. Since they aren’t considered to be reusable, riders could carry a spare link or two and throw them on the existing chain should something happen.
When the chain is mounted on the bike, it follows a path called the “chain line”. Although some lateral motion is acceptable, and even desired on bikes with multiple gears, the chain is better off staying as straight as possible.
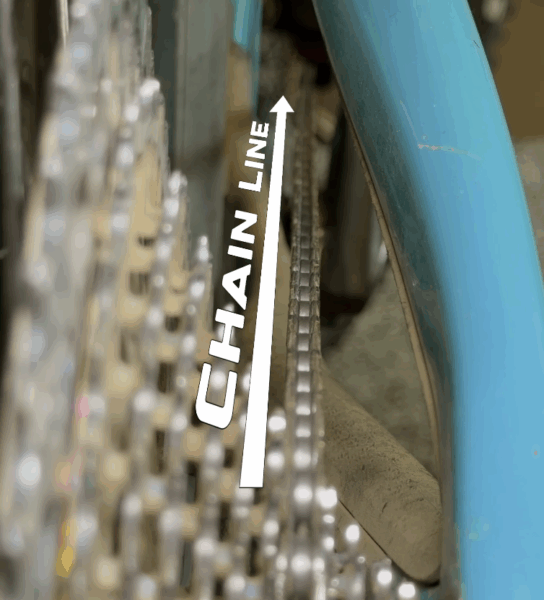
This means that, on bikes with multiple gears in front and in back, it is best to keep your chain from accessing gears on the opposite sides of the chain line. A straight chain is better.
Big-big and small-small gears are not optimal to the wear and tear of your chain and other parts.
Try to keep your chain as straight as is reasonable to avoid extra friction in the system, robbing you of efficiency. Sure, your derailleurs will allow you to shift into gears that are laterally separated, but you can usually find a gear on your bike that is very similar in pedaling efficiency and power using a more “straight” ratio.
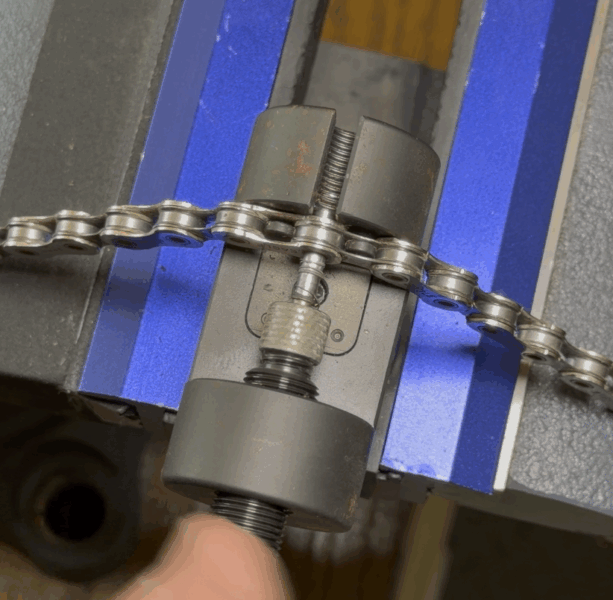
Over time, chains are known to “stretch”. Chains don’t actually stretch, but the measured distance between link rollers can increase over time and wear down chainrings and cassette gears.
This is primarily caused by the wearing of the roller and its bushings. As the chain is used over many rides and many years, the rollers grinding against the gears and pins changes the amount of play in the system. This increases the open space inside the links. It wears down the gears, and causes all sorts of problems.
Using a chain without lubricant for too long accelerates this process. A worn chain wears down gears, and installing a new chain on worn gears can cause that chain to jump off the gears under power, often causing crashes and injury. If your chain is worn, it’s usually time to replace your gears at the same time.
Using a chain stretch tool regularly helps monitor chains and, in the long run, can save money both on bike parts and hospital bills. This one measures the width of the rollers and lets you know when it’s time to get a new chain.
Chainrings
Let’s talk chainrings. Whether road or mountain, big or small, single or triple, your bike is almost guaranteed to have one or more of these.
A hot button issue in the chainring world is the battle between round chainrings and oval, or elliptical. Some people take this pretty seriously.
In the late 1980’s, Shimano released a product they called “Biopace”. It was a non-round chainring that they claimed would make your pedal stroke more efficient. They pushed it pretty hard in the bike magazines and even included it on a variety of OEM kits, sold on new bikes.
Over the years, different companies have released their own versions of the oval chainring. Some are pretty conservative, while others are, well, outlandish.
Do oval chainrings help with your pedaling or not?
This debate has raged throughout the decades. Studies decry the use of non-round chainrings, stating things like “results… show clearly that, in many cases, ‘advantages’ and ‘disadvantages’ are inseparable.”
Sheldon Brown said it best: “The theory was that while the cranks are horizontal you can pedal more efficiently, and thus can push a higher gear. When the cranks are vertical, you get a lower gear due to the smaller effective radius of the chainwheel. The lower gear is easier to push, and you get through the dead spot sooner.”
He goes on to say that this idea looks great on paper, but is not very effective in practice.
There are also arguments that oval rings are more likely to drop your chain during the transition from higher to lower radius – especially on rocky terrain. Others say that oval rings can interfere with crank-based power meter readings.
If you use non-round chainrings, you are, of course, welcome to your own opinions. Personally, I stick to the circular ones.
Shifters
The shifter is set apart from the rest of the drivetrain both physically and operationally. Typically located way up on the handlebars, the shifter is the part of the system that you interact with directly. Using your hands.

Older bikes had shifters located on the downtube of the bike or even, in the cases of extremely old bikes, down by the derailleur itself. The first shifters were lever-actuated and required the rider to reach down and grab a lever to push the chain into the desired gear.
Modern shifters live on the handlebars, right where they are easy to grab and use, and they are more complicated, and precise, than ever before.
Traditional cable-actuated shifters pull a cable through tubular housing and work against the resistance of the derailleur to set the chain in the proper gear. This system has been perfected to the point that – in most cases – even economy bikes have shifting systems that work pretty well.
Mountain bike shifters started out as friction-based thumb levers, located on the handlebars of the first mountain bikes in the late 1970s. They eventually gave way to the indexed shifting systems, where specific clicks in the shifter corresponded to the specific gears. This improved the accuracy of shifting and resulted in fewer mis-shifts.
Road bike shifters followed a similar trajectory, with one major difference. Unlike mountain bikes, road bikes integrated the shifter into the brake lever. This provided easier reach and a more natural feel.
In recent years, electronic shifting has become more popular. Usually wireless, these systems use an encrypted RF signal to communicate between the shifter and the derailleur. These systems are very sturdy – you can have hundreds of bikes in a group, all using wireless systems, and the signals never get confused.
Derailleurs
Pronounced “derailler”, the spelling officially contains a “U”. Many argue over the proper pronunciation and spelling, but I’ll just call them “deraillers”. You can spell the word however you wish.
Traditionally, bikes have two of these; front and rear derailleurs. They are designed to move your chain from gear to gear, in the front and in the rear, with minimal effort and noise. They regulate pedaling cadence as it relates to speed and power.
This is accomplished by guiding the chain, which has a small degree of lateral flexibility, into the desired gear. The derailleurs are positioned to best allow them to guide the chain as it enters into the gear clusters.
There are several ways to classify a derailleur. The most obvious is by the number of speeds, or the capacity of the device. Larger capacity derailleurs are capable of shifting through a wider range of gears.
The other major classification is in cage length. Front derailleur cages are the larger, curved section that performs the job of moving the chain from gear to gear. Rear derailleur cages are the lower sections that hold the jockey wheel, and the guide pulley. These also move the chain, you guessed it, from gear to gear.
The larger these cages are, the wider the range of gears that can be used.
Front and rear derailleurs operate on similar principles. They use a parallelogram design to move laterally, guiding the chain. This keeps the cage of the derailleur parallel with the chain line, and aids the function of shifting precision.
It is actuated using a powered motor, or a cable and spring mechanism. The body of the derailleur is fixed to the frame of the bike and the cage is mounted to the other end of the hinged parallelogram.
See how the cage is always straight? Pretty cool design, right?
Early derailleurs used a friction-based system where you had to feel out what gear you were in. Many people looked down at the gears while they were riding to know for sure if their gear was correct. In the 1990s, the indexing revolution took off and “clicks” were added which aligned shifting numbers to the rear gearing distances. This system made shifting fast, easy, and clean.
Most derailleurs have two small screws that bump up against metal tabs that live inside the parallelogram. These screws and tabs limit the range on the derailleur. They’re called limit screws, and they keep the chain from being accidentally pushed too far in our out past the gear range.
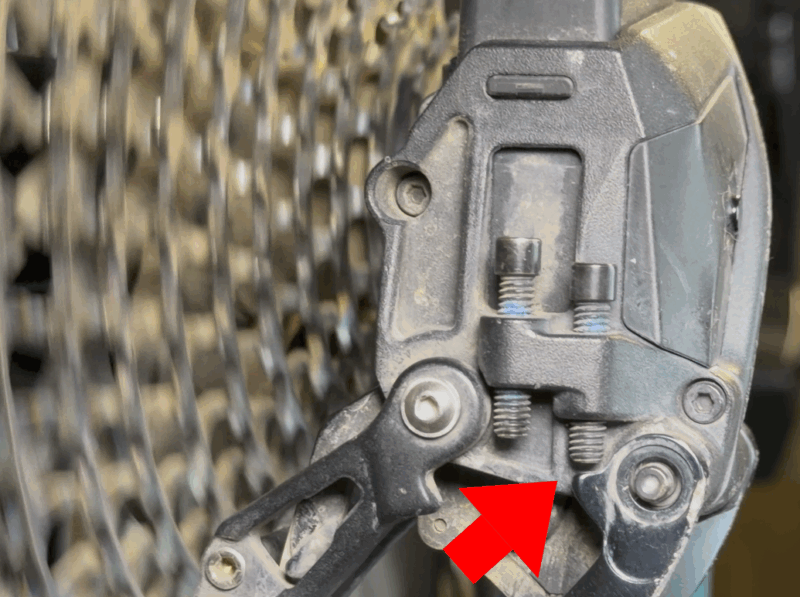
Rear derailleurs have something known as a “B tension screw”. This screw helps regulate the distance the jockey wheels are from the rear cogs. It is an adjustment that can fine tune shifting lessening noisy or sloppy operation.
Starting in the early 2010s, Shimano and SRAM added clutch designs to the bodies of their rear derailleurs. These designs added resistance to the spring mechanism and helped to prevent chain slap, the phenomenon of the chain flailing and hitting the frame when riding over bumpy terrain.
Rear Cassette
Almost all bikes allow you to stop pedaling when you feel like it. On a downhill, when you’re tired, or when you need your attention elsewhere, it’s nice to pause your pedaling without stopping the bike.
But this wasn’t always the case.
Before 1894, if you had a pedal bike, you were connected to the wheel – in both directions. If you stopped pedaling, your wheels stopped spinning.
Charles Linley and John Biggs, a couple of cycling engineers in late 19th century London, developed “improvements for velocipedes”. These improvements included a way to change gears, but it required backpedaling. This compelled them to develop a system where the wheel could spin freely during an absence of pedaling force.
Later on, John Archer joined the group and Linley, Biggs, and Archer patented their invention in 1894. Released four years later, their “Free Pedal” technology would revolutionize cycling.
This system was eventually integrated into almost all bicycles. At first, it existed inside the rear hub. Later, it was built into the gearing cluster, and it attached to the hub using threads. Modern “freehubs” have come full circle, with the system built back into the hub body and gears connecting using parallel splines.
The freewheel mechanism is, essentially, a ratchet. That is to say, the rotation of the hub spins freely in one direction and engages in the other direction.
This is achieved using a pawl and drive ring system. The gears are attached to a toothed ring that actuates when there is pedal force on the system. This engages the pawls, which are small spring-loaded fingers that catch on the teeth. The pedal force is transmitted through the system and the wheel spins.
Tips
- Everything that your chain touches is connected. These items wear together. If your chain is worn, that means it is wearing your chainrings, and possibly also your rear cassette. Measure your chain for wear often, and service it before it needs it. Your drivetrain will thank you.
- It is possible to over-lubricate. As I discussed in my video about chain waxing, it’s pretty easy to use too much lubricant when oiling your chain. Too much means that the excess will attract grime, and cause premature wear on your drivetrain parts. Add only as much as is needed, allowing it ample time to dry, and remember to wipe off the rest before riding.
Oh, it’s also a good idea to let a chain sit for a half hour or longer after applying lube. Let that stuff sink in and get to the parts that need it most. - Chains ship covered with a waxy grease that is only there to prevent rust during shipping. This stuff is very sticky and attracts dirt and abrasives more than even regular oil-based lubricants. Use solvents (SAFELY) to remove this gunk before installing the chain for the first time. After that, use your lubricant of choice and you should be in good shape.
- It is possible to replace your gears in order to make your pedaling easier, or to give you a higher top speed on those downhills. Remember that, when you change the size of your gears, you may also need to change the length of your chain. Too much slack, or not enough, can lead to bad shifting, premature wear, and an increased likelihood of the chain falling off during a ride.
- What’s that squeak you are hearing when you pedal under load? It may be your bottom bracket! Sure, seatposts, saddles, and pedals can creak a bit under pressure, but the bottom bracket is usually the source of louder creaking sounds. Those bearings take a lot of pedaling strain, and they are also located at the bottom of the bike, where they can easily get wet and ruin the grease that they need to operate smoothly.
Bottom bracket replacement is fairly cheap and simple, but it often requires special tools. Talk to your local bike shop if you need help. - If you are running a through-axle, or a fat axle that screws into your frame after running through the hub, remember to keep it tight! If your rear axle works itself loose while on a ride or after rattling around on your vehicle’s bike rack, it can cause the freehub body to pull away from the engagement ring and the pawls can slip while pedaling. That can turn into an expensive repair!
This happened to me a few years ago and I had to replace an expensive hub. - If you are a rider who enjoys wireless shifting systems, always bring an extra battery. I keep a derailleur battery as well as a shifter battery in my pack when I ride. I have only needed them once, but the ride would have been a lot worse without them.
Drivetrains are the most complicated part of any bike. Throughout the ages, these systems have helped countless people ride more safely, efficiently, and easily.
From pedaling, to shifting, to figuring out the gears, understanding your drivetrain will help you maintain it properly and use it effectively.
Thanks for watching, now get out there and ride! And I’ll see you when I see you.