How can I breathe new life into an older, but still very rideable bike?
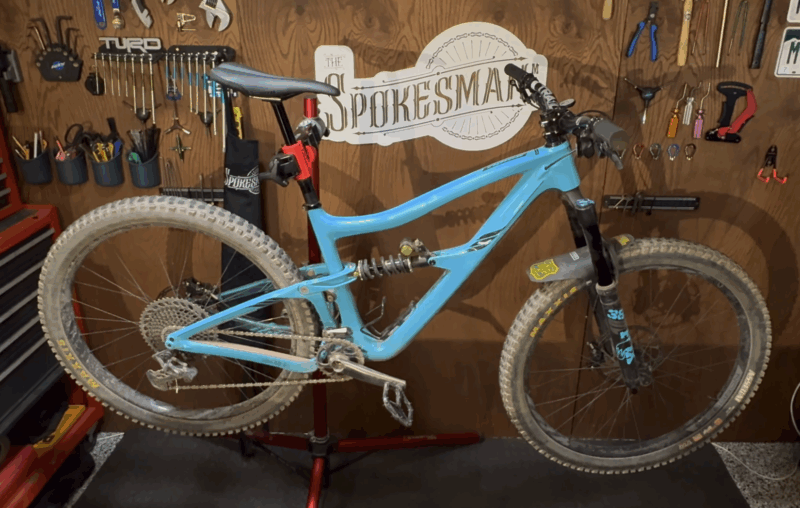
Today’s topic involves the process of making over an older enduro bike of mine, my 2020 Ibis Ripmo v2. I’m giving it a few alterations in order to get a better ride on my local Colorado trails.
Most of the parts are either warranty replacements or are used parts that came of the bike earlier in its life. Aside from the new tires and the fork rebuild kit, I don’t think I am purchasing much for this project. I doubt the cost will exceed $100.
This Ripmo was originally purchased over five years ago, during the pandemic. This specific design is considered to be one of the best enduro frames ever developed. It has perfect angles, it’s relatively light weight, and it uses all of the standards of the day including a DUB drivetrain, a patented DW-link suspension system, a 210 x 55mm rear shock mount, 160mm of travel up front with a 44mm offset, 29” wheel sizing, boost axles, a threaded BSA bottom bracket, and brake mounts adaptable up to 203mm rotors.
Those of you who watch the channel might remember the big day when this bike joined the family, I made a video about it. It was my first 29” wheel bike, and it carried me up and down mountains all over the country.
When I bought a place in Colorado, I wanted to be able to travel back and forth easily, and without the need to carry a bike. To that end, I picked up my Yeti SB-150. It’s a good, solid ride that works well on the aggressive and rocky trails here.
I didn’t realize that I would be moving to Colorado full time so quickly. I expected to have a California bike and a Colorado bike. I could ride the Ripmo in Santa Cruz, where it was born, and the SB-150 in Colorado, also where it was born.
After I moved, I had two enduro bikes! What a great problem to have!
I left the Ripmo at a friend’s place in California for a while and it slowly became my passive ride. I visited the coast less and less, and that bike started to gather dust.
A few months ago, I rescued the Ripmo and brought it to Durango. I retrofitted it with a cable-actuated drivetrain for a trip to Nepal that I never ended up going on, and I rode it a few times on my local trails right here in town.
When I hit the local dirt, one of the first things I noticed was how well this bike climbed. The 76º seat tube angle is less than one degree different from the Yeti’s 76.9º, and the other major angles and measurements are within millimeters of each other, but that Ripmo is a mountain goat on the climbs!
You see, the town of Durango is home to a wide variety of trails. They vary in terms of terrain, steepness, difficulty, and flow.
My standard morning loop is on a set of trails that is pretty close to my front door. Overend Mountain Park, or “Test Tracks”, as it’s referred to locally, contains some great climbs, a few rocks, steep ups and downs, and the best flow trails in town.
Other local trail systems are not nearly as forgiving. Animas Mountain is covered in mean, aggressive rocks, and Horse Gulch has some morale-boosting tech and steep drops.
They’re all fun, but each presents its own set of challenges.
The Ripmo is going to be my Test Tracks bike. I’ll jump on it and hit the dirt several times a week, getting my climbs and turns in usually before I have my morning coffee.
Oh, and the Ripmo is coming in at a pre-makeover weight of just under 32 pounds. The SB-150 is coming in at almost 33½ pounds.
That’s pretty close!
I’m hoping that the changes I make to the Ripmo save me a few pounds of weight and turn this bike into an even better climber. It would be nice if I could save five pounds, but that may be a bit too optimistic.
Let’s see how it all goes!
The Equipment
Here’s a rundown of the changes we will – and won’t – be making.
The Wheels
The wheel set on the bike currently is pretty decent. It has Ibis S35 carbon rims laced with Sapim bladed spokes and Ibis branded hubs.
The new set will have the same Ibis carbon rims and Sapim spokes, but it will get Industry Nine Hydra hubs.
I would have used these wheels on this bike earlier, but I had a rim fail on me last year and I only recently warrantied and rebuilt it. Now this wheel set is ready for action!
Rear Shock
The DVO Jade X coil shock has definitely served this bike well. On trails all across the USA it has reliably carried me over some pretty gruesome terrain.
But I’m looking to save weight, so I’ll be replacing it with the original Fox Float DPX2 Performance shock that shipped with the bike when it was new. I think this thing has less than twenty miles on it.
Tires
My original tire choice for this bike was a Maxxis Minion DHR II on the rear and an Assegai on the front. Both 2.5” wide. This bike has run a variety of tires over the years, from Aggressors to Rekons, and I must be honest – I haven’t really felt the difference – even on the big climbs and rough terrain!
The new tires will be a brand new pair of Dissectors. These will be 2.4” wide and come in slightly lighter than their predecessors. And the tread looks similar.
Drivetrain
Swapping the drivetrain for my old SRAM X01 AXS may not save much weight, but it will be super responsive and it will cut down on cockpit clutter. It should be an easy install.
I’ll also check the chain for wear and replace it if necessary.
What isn’t getting changed up?
The Suspension Fork
This would normally be an easy one to put on the list of replacements. The existing shock is old, but it’s s till in great shape and likely only needs a minor rebuild. So that’s all I’m going to do here.
The Dropper
My dropper post is a snappy and responsive OneUp v2 that doesn’t need any help at all.
The Cranks
My cranks are the same on both bikes – the Cane Creek EEwing Ti cranks are doing their job without the slightest hint of a complaint. And I doubt I could lighten them up much at all.
Let’s start with the wheels. This is probably the biggest part of the project.
Well, maybe the drivetrain is more consequential. It’s hard to say before we get this thing out on the trails.
The old wheels are coming off. They aren’t a bad set, but I’m looking for weight savings, so this bike is getting the I-9 hubs. These old dirty boys will get cleaned up and hung in storage to wait for me to need a spare.
The tires have a little bit of life left in them, so I’ll leave them on those old wheels. The new wheels are a definite upgrade. These Industry Nine Hydra hubs are pretty sexy.
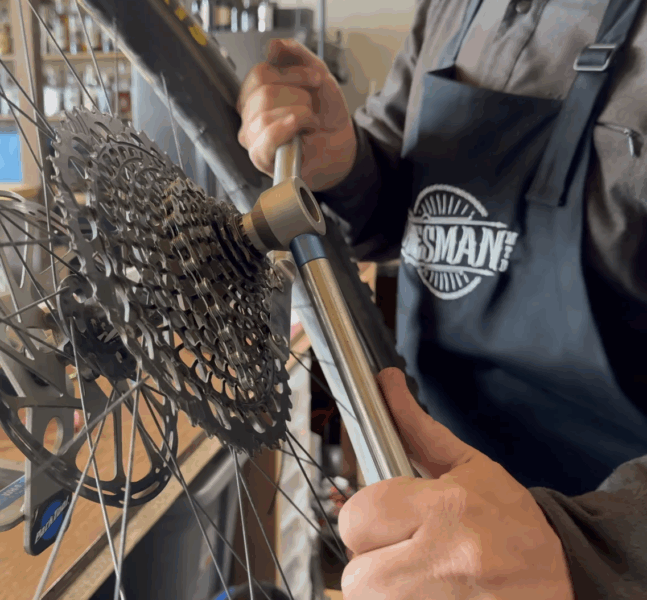
Honestly, I likely won’t notice much of a difference apart from the number of engagement points, which will help me on my climbs, and the obvious increase in decibels.
The rear rim is brand spankin’ new. As I said before, it’s a warranty replacement. The front rim should look almost as good as the rear after I give it a good wipe down.
This brand new set of tires was purchased as overstock online from a major retailer. Notice the white Maxxis logo – these were originally meant to be used as OEM parts.
OEM, for those of you who don’t know, means “Original Equipment Manufacturer” and it means the parts that shipped on the product when it was brand new. Your Toyota windshield on your 4Runner is OEM. The cheap replacement from the glass repair shop is considered “Aftermarket”.
My old SRAM AXS X01 system is going back on this bike. It’s replacing an X01 setup that was cable-driven. Nothing wrong with that – but I have the AXS system, so why not use it?
I got to remove the derailleur, shifter, cable, and housing. It was a bit of work, but the bike looks much cleaner for it.
I had trouble with the wireless shifter and rear derailleur. I couldn’t tell you why, but they weren’t getting along and I had to do a factory reset and pairing to get them to work again.
It also didn’t help that the derailleur sat too long and the gold battery contacts were not playing nice. I got my battery to power the unit after a quick wipe down.
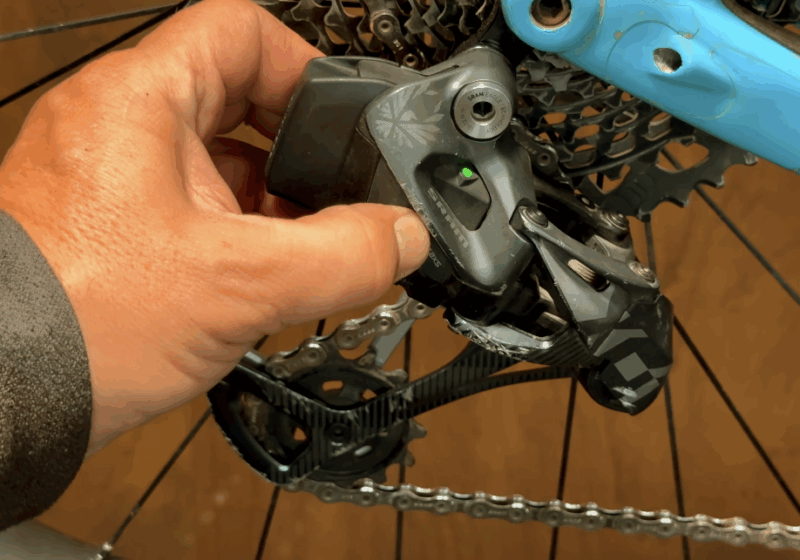
After installation, I was encountering difficulty getting the shifting to line up. It shifted well in the lower gears, but not the higher ones. Then, if I tuned it for the higher gears, the lower ones were out of whack.
This issue is most often caused by a bent derailleur hangar. I pulled out my alignment tool and got to work on straightening it out. Now she shifts beautifully.
No chain stretch, so this 12-speed chain is going back on the bike.
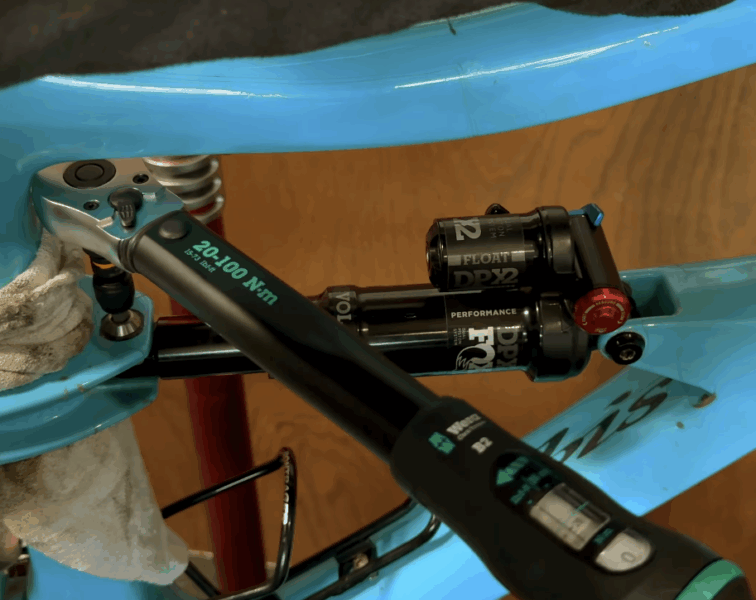
The DVO rear coil shock is being replaced with the Fox Float DPX2. This will match the Performance-level front fork and make the bike look a bit more unified. It will also probably save some weight!
I’ve gone over this process in the past, so I won’t go into too much detail.
To put it simply, I needed to remove the old shock from the bike, swap the bushings onto the new shock, and install and tune everything properly.
Removal was simple. A few bolts were loosened and the shock popped right off the bike.
Removing the bushings presented a challenge since I didn’t have specifically designed tools for the project. I used a socket as a receiver and needed to use another socket to push the bushings through the old shock using my bench vise.
It worked fine, but I should have found a pusher that was just a little bit bigger. This one got stuck inside one of the bushings, but it came out pretty easily.
Once the bushings were installed, the shock went on the Ripmo effortlessly. A few torqued screws and all that was left was to bring it up to pressure and test ride the bike.
She runs pretty smoothly. The shifting is solid, and the brakes seem to stop me without any issue.
The last part of this project is an upper-leg servicing for the Fox 36 front shock.
This is a fairly simple process, but it can be daunting if you have never done it before. Fortunately, I have done it before!
I’m going to need to re-learn how to do this right.
Once… A few years ago… I’m going to need to re-learn how to do this right.
I gave the forks a thorough cleaning. They have a lot of little scrapes and the paint looks oxidized in a few spots, but I don’t see any leaks and they are in good working order.
Disassembly was pretty straightforward. Before I could take the fork off, I needed to remove the brake caliper from the fork leg.
I mounted the fork on my workbench and removed the protective cap from the rebound screw. After that, I removed the screw knob and unscrewed the two nuts from the airspring and rebound legs.
The fork legs came off easily. I had to use the removal tool on one of the legs, and the other pulled through easily and without effort.
I drained the existing oil into a drain pan.
Then I poured some 20wt into a cup and soaked the new foam rings. These need to stay wet with oil to provide continued lubricant to the fork legs as they are used.
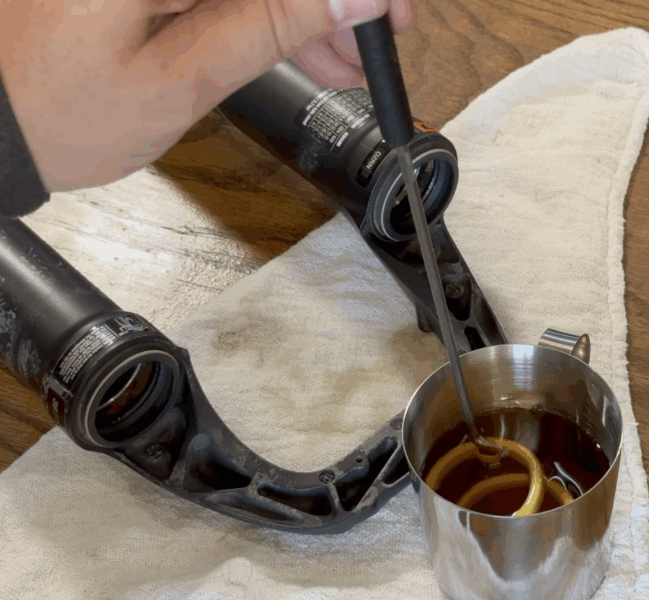
I pried the seals and old foam rings out using a tire lever, but they tore and left me with more work to do. I eventually pried them out after a lot of effort and after switching to a fixed wrench as a pry tool.
Wow, those got pretty dirty!
After a quick wipe down, I installed the new foam rings and knocked the new seals into place using a special tool that ensures proper alignment.
Then I greased the seals with some fork lube.
Oh, and I was sure not to forget the O-ring on the fork leg. That’s impossible to install after the fork is put back together!
Next came the installation of the lower legs onto the stanchion tubes. They were stubborn, but I got them to line up properly and they eventually slid right on.
With the lower legs installed, I added airspring and damper oil to the legs. I added new crush washers and installed the threaded nuts at the bottom of each leg using a torque wrench.
The rebound knob went back on, and then the protective cap.
After a wipe down, I added air to the shock and tuned it.
The fork installation was simple. I put all the parts back on the bike and tightened everything to its proper torque. Everything seems to work just fine. I can’t wait to get this bike out and ride some trails!
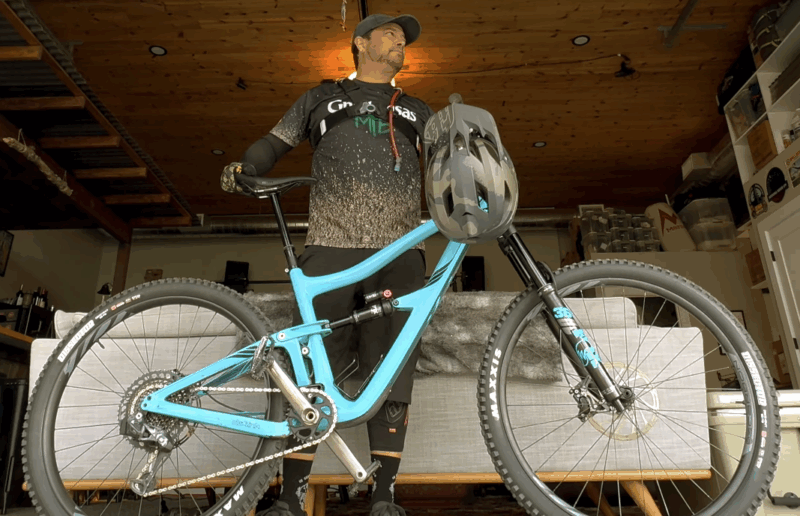
It felt fantastic to get this beast out riding on dirt. Right away, I noticed two things.
First, my AXS shifter buttons were reversed. It’s because I performed a reset when I installed them. This was pretty annoying, but I was able to stop at the trailhead and pair the parts to my phone and correct the issue. Good to go!
The other thing was my stem and bar alignment. My bars were aimed maybe one degree to the right. It wasn’t enough to affect my riding, but it was distracting when I looked down at my cockpit.
Also easy to fix, but it had to wait until I got home from the ride.
Suspension pressure was pretty good, only required minor adjustments. The tires were grippy and fast, the brakes were solid, and the shifting was spot on.
The rebuild was an improvement, for sure! The bike rides smoothly, a lot like it did when it was new, and it climbs incredibly well.
And now it’s dirty again! Mountain bikes look better when they are dirty.
Does it climb better than it did before this project? It’s hard to say. I lightened the bike by two pounds, and that’s not trivial on a 30 pound bike, but I can’t tell if the perceived improvement is because of the lighter, snappier bike, or if I just convinced myself that the bike is a better climber now. Maybe it’s all in my head.
It was worth it. I enjoyed wrenching on the bike for a day, and it really is great to get out on this improved machine.